The Battle of Ottega was a battle fought during the Galactic Civil War in the Ottega system. This battle was expected as the simple elimination of all traitorous Admiral Harkov's remaining forces but turned as the beginning of the Grand Admiral Zaarin Insurrection.
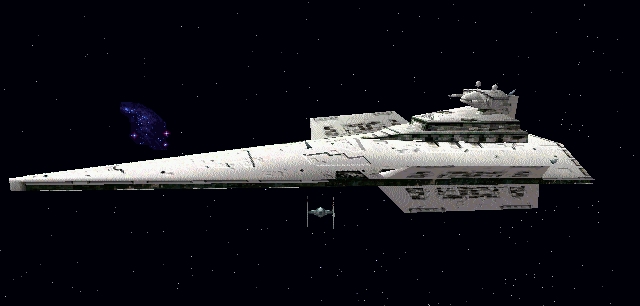
Admiral Harkov's Protector.
Following the execution of Admiral Harkov, the Galactic Empire decided to eliminate Harkov's remaining forces. The remnants of his fleet, more specifically the Victory-class Star Destroyer Protector had successfully been located in the Ottega system. The warship had stopped in the where Rebel forces had left cargo containers with which to supply the remaining traitorous forces. Darth Vader dispatched a fleet led by the Imperial-class Star Destroyer Garrett and including the Interdictor cruiser Harpax in the system.
The Harpax entered the system near the Protector, activating its gravity well projectors in order to keep Harkov's fleeing associates from escaping. Two flight groups of TIE Avenger starfighters deployed with the Harpax, ordered to destroy the cargo containers to halt the traitor's re-supply efforts and protect the vulnerable Harpax from counterattack until additional Imperial forces could arrive.
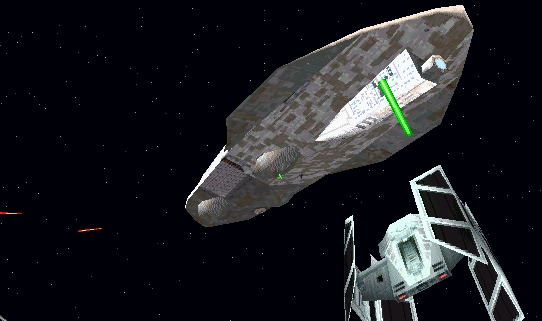
Maarek Stele engaging the Warhawk.
Emerging from hyperspace, the TIE Avengers Alpha encountered TIE/IN interceptors H-Delta barreling down on them, warhead launchers armed. Splitting their flight group, Avengers Alpha proceeded to destroy the Rebels' containers as their wingmen handled the harassing TIE/LN starfighters, TIE/IN interceptors, TIE/sa bombers, and Avengers. Imperial starfighters quickly succeeded in destroying the supply cache, moving on to fend off enemy fighters. Avengers Alpha rallied back towards the Harpax, awaiting additional Imperial forces to arrive. Remaining traitorous TIEs continued to pursue, joined by the Mon Calamari MC40a light cruiser Warhawk. Z-95 Headhunters and T-65 X-wing starfighters soon joined the battle, originating from the Warhawk, and began attacking the Harpax. Moments later the Nebulon-B frigate Akaga also emerged from hyperspace, launching more Z-95s. Imperial TIE Avengers acted swiftly to eliminate the impending threat on Interdictor Harpax as Z-95 Headhunters from the Akaga began firing proton rockets and bombs. Avengers managed to intercept incoming warheads with laser cannonfire between eliminating the rest of the starfighter threats. The Assault Transports Lambda arrived on the scene, followed by Avengers Alpha and Beta, who returned to their hangars for the next assault.

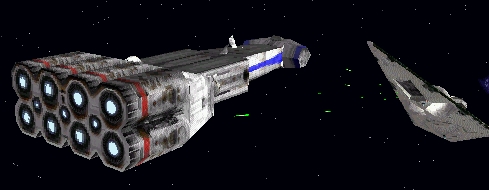
Akaga firing its turbolasers.
With the arrival of the frigate Akaga, Imperial pilots from TIE Avenger Alpha returned to the field to defend the Interdictor. Expecting the arrival of Darth Vader aboard the Imperial-class Star Destroyer Garrett, TIE Avengers Alpha entered the system armed with space bombs to destroy the Akaga. Alpha delivered the first devastating blow to Akaga, lowering the warship's shields with a single volley of space bombs. Prepped for reload operations, the Delta-class DX-9 stormtrooper transport Goya arrived as Avenger's warhead magazines ran dry. Avengers Beta and Gamma covered attack operations on the Akaga by intercepting incoming enemy TIEs and Z-95 Headhunters. Members of Alpha flight conducted docking operations until the Akaga collapsed under their massive wave of missiles. With the frigate out of the way, Imperial Avengers continued their mop up operations as the Garrett arrived. The pace of the operation hastened with Darth Vader on-station; Imperial pilots reported to the Garrett to prep for the next phase of the attack.
Maarek Stele and his wingmen were sent out again, once more in TIE Avengers, this time to remove the Protector and the Warhawk before they could destroy the Harpax and escape. Neither ship had any remaining fighters, leaving a fairly simple task for Stele's flight group.
Targeting the Warhawk first, the cruiser was soon destroyed, and the Imperials turned their attention to the Protector. At this point, some Alpha-class Xg-1 Star Wings arrived. This was the first part of a force sent by Grand Admiral Demetrius Zaarin, supposedly to help the Imperials in the area. However, the Gunboats targeted the TIE Avengers of Stele and his colleagues.
Falcon 2 engaging the Harpax.
As the TIE Advanced bore down on the Protector, Zaarin's Assassin-class corvettes arrived, followed by some Gamma-class ATR-6 assault transports. However, instead of turning to attack the Protector, they began to fire on the Garrett and the other loyal Imperial craft. The Immobilizer 418 cruiser, Harpax, which had been fleeing from the battle, was caught by part of the traitor's forces. Having been damaged in the previous engagements, the interdictor was destroyed, allowing the Protector, under a barrage of torpedo fire, to power up its hyperdrive. Its escape attempt was in vain, however, as Stele finished the defecting Star Destroyer personally. Having done so, a small Rebel force, consisting of two CR90 corvettes, two Delta-class JV-7 escort shuttles and some B-wing starfighters arrived, but this was ignored as Zaarin's forces posed a greater danger to the Garrett. Stele led an attack on Zaarin's forces, destroying their entire strength while taking minimal casualties. With the traitors destroyed, Stele finished off the Rebel force, before landing on the Garrett.
Having discovered Zaarin's treachery, Darth Vader decided to rush to Coruscant to prevent Zaarin's attempted coup. But the Garrett was too damaged to travel to the Imperial Center. Vader chose five elite pilots, including Maarek Stele, to assist him in flying six TIE/D Defenders to Coruscant.
The battle was first featured in the 1994 LucasArts video game Star Wars: TIE Fighter, in which players fly as Maarek Stele. The battle is depicted in the three first missions of the game's seventh tour of campaign, "Treachery at Ottega."
Although it is possible to save the Harpax in the game, its destruction is confirmed in Maarek Stele's mission report in TIE Fighter: The Official Strategy Guide.
- TIE Fighter: The Official Strategy Guide
- TIE Fighter Collector's CD-ROM: The Official Strategy Guide
- The Essential Chronology
- The New Essential Chronology
- The Complete Star Wars Encyclopedia