Soon after the Battle of Muunilinst, Fordo would lead a team of 20 ARC Alpha lieutenants on a mission to evacuate the surviving Jedi Generals from Hypori. This operation would see them engage in a vicious battle with General Grievous. Although they were the best of the best, The Muunilinst 10 would sustain some casualties. The clone trooper CT-43/002 was killed during an ambush on Muunilinst and four ARC Alpha lieutenants were cut down by Grievous at Hypori.
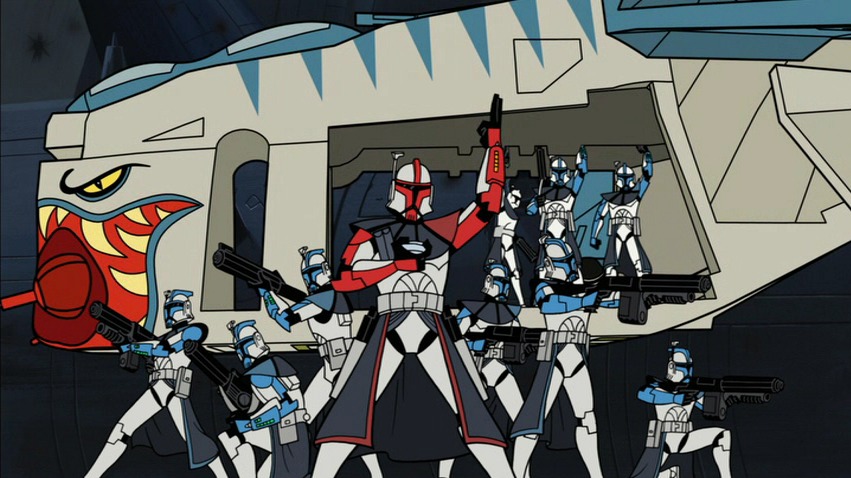
Captain Fordo and the remaining members of the Muunilinst 10 awaiting General Kenobi.
The Muunilinst 10 were deployed to destroy a Separatist artillery cannon and aid in the capture of key InterGalactic Banking Clan officials. While flying in a modified LAAT/i gunship to their target area, the gunship was shot down by a B1-Series battle droid with a rocket launcher, and it crash-landed in the city, killing the two pilots. When they exited the gunship, they were surrounded by sniper-fire. One clone, CT-43/002, was killed instantly in the barrage.
Fordo ordered two of his clones to distract the droid snipers and another clone to scope the location for the snipers. After spotting the droids' locations, an ARC trooper wielding a PLX-1 destroyed the building ledges where the snipers had been.
The group kept going toward their objective, and eventually encountered an AAT. While one ARC Lieutenant crept up on the AAT from above, the remaining eight provided cover fire. The ARC jumped on top of the AAT, fired his way inside, and planted explosives, before jumping out and detonating them.
Eventually, they arrived at the artillery cannon and after destroying many battle droids, destroyed the cannon with several high powered explosives and rappelled up the control tower.
After the arrival of Jedi General Obi-Wan Kenobi, they blasted their way inside the command center, defeating the numerous droids guarding it and taking and aiding in the defeat of the feared bounty hunter Durge before securing the room, despite some of them suffering injuries inflicted by Durge. This action was the key point in the Republic's capture of the planet.
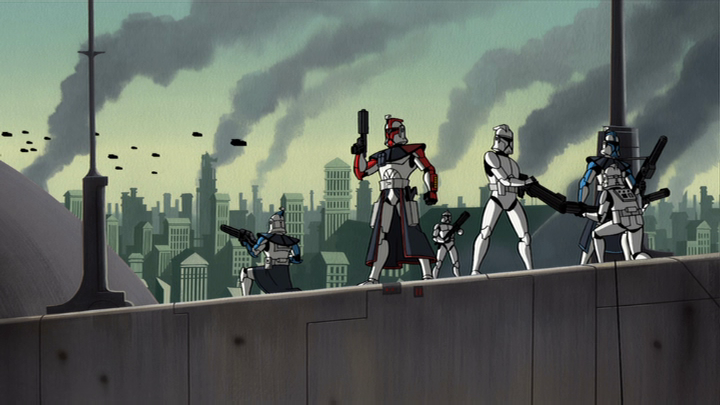
The Muunilinst 10 deploy from their LAAT/i on Hypori.
The survivors were reinforced with heavy gunners and additional troops and were sent to Hypori to retrieve the surviving Jedi of the Battle of Hypori, and arrived there in surprisingly little time. There, Fordo ordered two of his men to investigate two of the three life signs he detected. While one of his men investigated one of the life signs in the rubble and another in the rafters of the downed Acclamator assault ship, Fordo led the rest of his men to the one directly ahead of them. The life sign Fordo detected turned out to be Ki-Adi Mundi, who had just been disarmed by Grievous. General Grievous was about to deal the killing blow to Mundi when Fordo and his men opened fire on him. Grievous was able to evade the fire by ducking behind rubble. The troopers used the power of the Z-6 rotary blaster cannon, reciprocating quad blaster and under-barrel grenade launchers to destroy the cover provided by the durasteel. However, Grievous was able to continue to evade fire. Grievous attempted to scale up to the roof but was forced down by a volley of grenades. He landed next to 4 ARC lieutenants whom he promptly cut down with his two lightsabers. Fordo called for immediate backup. The weaponry of their ARC gunship was able to drive Grievous off, enabling evacuation of the survivors. Fordo was granted Jaig eyes for his actions on Hypori.
They were present at the Battle of Coruscant, among other clone troopers defending sector 4, when they became overwhelmed. Captain Fordo ordered a retreat, but was belayed by Masters Yoda and Mace Windu who arrived to assist.
The Muunilinst 10 were referred to as the best of the best, and were extremely effective in battle. As such, they carried many weapons, including standard issue BlasTech Industries DC-15A blaster rifles, modified DC-17 hand blasters as well as WESTAR-M5 blaster rifles, thermal detonators, heat signature detectors, PLX-1 portable missile launchers, Z-6 rotary blaster cannons, droid poppers, and reciprocating quad blasters.
The Muunilinst 10 LAAT was repainted with a Rancor nose art design. The gunship had a jagged blue line up to the top of it. There was also blue covering the missile pod and wings, except the wings, which had white triangles going to the top.
Although the Guide to the Grand Army of the Republic establishes that a total of 10 clones (including Fordo) comprised the Muunilinst 10, the number shown on-screen varies considerably. After Kenobi's briefing in Clone Wars Chapter 2, nine clones are shown. Ten are visible after the LAAT/i is hit by a missile, and eleven disembark from the fallen gunship. The number once again reduces to ten in a scene when the clones plant the explosives on an artillery cannon. When Obi-Wan Kenobi rendezvouses with the Muunilinst 10, there are again nine clones. Finally, during the battle with Durge, the number of clones exceeds ten, which could mean that the unit has regrouped with the main invasion force in order to capture key InterGalactic Banking Clan officials. The number of ARC Alpha Lieutenants also changes from two to three to four, depending on the scene. Additionally, during the Battle of Hypori, nineteen clones are seen in several shots, with the number fluctuating as with previous chapters.
- "Guide to the Grand Army of the Republic" — Star Wars Insider 84
- The New Essential Chronology
- The Complete Star Wars Encyclopedia
- The Clone Wars Campaign Guide