Star Wars: Bounty Hunter is a third-person action-adventure video game that preludes Episode II Attack of the Clones and tells the story of how and why Jango Fett became the template for the clones of the Grand Army of the Republic. It was developed by LucasArts and released in 2002 for the PlayStation 2 and Nintendo GameCube. The game was made available for PlayStation 3, via PlayStation Network, on April 28, 2015. In Japan, the game was re-titled Star Wars: Jango Fett.
When the leader of the Bando Gora cult, Komari Vosa, became a threat to Palpatine's plans, he instructed Dooku, his apprentice, to eliminate her. He also charged Dooku with finding a suitable person to become the template for the future clone army. Dooku decided that he could accomplish both of these tasks by putting a bounty on Vosa, and he only invited the very best to take up the challenge. These included two Mandalorian bounty hunters: Jango Fett and Montross.
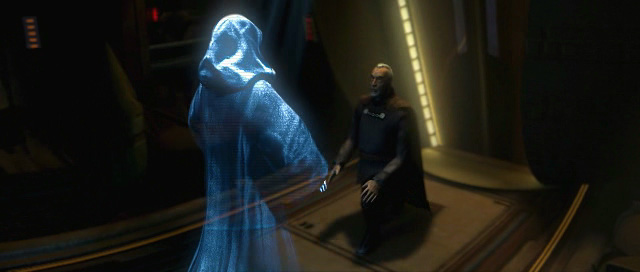
Darth Tyranus communicates with Darth Sidious, discussing their plot to find a host for the clone army.
Darth Sidious speaks to Darth Tyranus, telling him that the Bando Gora cult have become a "parasite" and need to be dealt with. He adds that Tyranus previously had a chance to eliminate their leader and asks his apprentice why he did not take it. Tyranus begins to say it was due to an experiment but Sidious cuts in that the experiment has failed. He declares "this deranged former Jedi has no place in my plans for the future" and orders that Tyranus rectify this mistake. He agrees to do so and asks after the clone army. Sidious replies that the cloners require a host and tells his apprentice that he must find an ideal specimen. Tyranus declares that he shall accomplish both tasks with a single stroke.
Aboard the Outland Transit Station, run by Jango Fett's Toydarian friend Rozatta, two borheks duel in the Pit Fight Arena, where the red challenger battles the standing yellow champion. Above the pit, the Muttani Meeko Ghintee sits surveying the fight alongside a Rodian and a Gran associate. Meeko is rigging the fight by controlling the red borhek with a neural implant. The red borhek defeats the gold champion, giving the Muttani a reason to celebrate. Jango arrives and shoots down Meeko's associates and in fear the Muttani drops down into the arena. Jango follows Meeko down, asking whether he would rather be caught dead or alive. Still controlling the borhek, Meeko launches the creature into Fett's back, causing him to lose his jetpack. Meeko escapes, and Jango is left to fight the borhek, which he disposes of and starts his pursuit of Meeko. The bounty hunter heads into the trading sector of the Outland Station, where he sneaks up behind an unsuspecting Gran, whom he interrogates to find out the location of Meeko's hideout. Jango retrieves his jetpack from a merchant on the way. Eventually Jango reaches Meeko's hangar, and has to battle the Muttani's ship, the Longshot, before he is able to capture him.
Having turned in his bounty, Rozatta informs Jango of a message for him. A hologram takes the form of Tyranus, who informs Jango that he is among a select few chosen for a special hunt. The prize: 5,000,000 credits, dead or alive. The target: Komari Vosa, leader of the Bando Gora. Rozatta is very concerned upon learning this, telling Jango that all bounty hunters who have set out to defeat the Bando Gora have vanished. But ultimately she is unable to dissuade Jango from taking on the hunt. He asks what she knows about the Bando Gora and she replies that she has only heard rumours. They are very secretive and "everywhere and nowhere at the same time." She remarks that she has heard that they are behind the new death-stick craze. Jango remarks that death-sticks are big in the underworld of Coruscant to which Rozatta comments that there is a bounty for a death-stick dealer on Coruscant, giving Jango a good place to start. As he is leaving, Rozatta remarks that he could run into Montross (Jango's enemy and rival bounty hunter) while on the hunt. Jango briefly pauses and replies "I'd be surprised if I didn't." Sure enough, Montross has received the same offer from Tyranus.
Jango heads to Coruscant in his trusted ship, the Jaster's Legacy. Rozatta believes that Jango should get a new ship rather than keep flying that "relic" but he refuses, stating that it once belonged to Jaster Mereel, who was like a father to Jango. Rozatta gives him information on the death-stick dealer: Jervis Gloom, wanted alive by the Coruscant Security Force. Both wonder if Gloom may know anything about the Bando Gora. Jango tracks Gloom down in the Industrial District, and learns that he works for Groff Haugg. Jango arrives at Haugg's plant and finds a batch of death-sticks which seem different to the ordinary ones and he sends a sample to Rozatta who uses a chemical analysis droid to determine that it contains an untraceable neurotoxin which Jango later realises can be used for brainwashing. Jango pursues Haugg, but is too late, as Montross has already frozen Haugg to death in carbonite. A fight ensues between the bounty hunters, and ends with Montross escaping.
Following the battle with Montross, Jango muses that Haugg could not have kept his operation secret without help and learns that Senator Trell of Ryloth is somehow involved in the death-stick trade. He heads for the Upper City of Coruscant, where he breaks into the Senator's apartment and dangles the Twi'lek over the edge of a balcony to interrogate him for information. Unfamiliar with Vosa, Trell reveals his underworld contact is Sebolto, a powerful Dug death-stick kingpin on Malastare, and pleads to be let go. A police gunship appears and they order Jango to release Trell. He promptly does so, releasing his grip and dropping Trell to his death. Jango then battles with the gunship, which he destroys before leaving Coruscant.
Rozatta warns that Sebolto will be wary of guests, and Jango replies that he will use a more subtle approach. Rozatta suggests using a bounty posted by Sebolto as a welcome introduction gift. The target is Bendix Fust; wanted alive with a 50,000 credit reward. However, Fust is currently serving time in the asteroid prison on Oovo IV. Jango briefly asks about Montross and Rozatta replies that he's in the Gazzari system. Jango breathes a sigh of relief as that system is nowhere near Malastare; meaning Groff Haugg lied to him. Rozatta tries one last time to convince Jango to give up on the hunt but she is unable to dissuade him.
Meanwhile, Vosa is informed by one of the Bando Gora that their contacts on Coruscant are dead and that bounty hunters were responsible. She is not concerned as only one of their underworld contacts knows the location of their moon. Regardless, she declares that if the bounty hunters surface again, they will be dealt with.
Jango heads to Oovo IV and manages to sneak into the prison by following and tricking a supply craft's crew into thinking his ship is a glitch in their computer. After making his way inside, Jango meets an old timer of the prison called Smootie. Smootie provides Jango with some useful information about the backstory of Komari Vosa and the Bando Gora before they part ways. Jango arrives at Fust's cell but he is snatched by a female bounty hunter (much to Rozatta's amusement). With a prison riot now in effect, Jango fights his way back to the Jaster's Legacy to find the other bounty hunter and Fust are already there trying to break into the ship. Upon killing the remaining guards, the two bounty hunters swiftly turn their guns on each other but, while they are debating, one of the facility's six prototype Firespray patrol ships flies overhead and destroys the Jaster's Legacy. Jango hopes the bounty hunter has a ship of her own but she stowed aboard a supply ship which was her plan for getting out until Jango arrived. With the prison now in full lock down, Jango tells the bounty hunter to guard Fust while he salvages what he can from the Jaster's Legacy. He sets off to steal one of the Firesprays and Smootie tells him how to disable the prison's shield wall. Jango succeeds, but before leaving, he destroys the five remaining Firesprays to prevent the prison from following him. The other bounty hunter deduces Jango's identity, having heard rumors about him and introduces herself as Zam Wesell.
Meanwhile, Montross has realised that Groff Haugg deceived him. As his lead has a vague connection to Bendix Fust, he learns of the riot on Oovo IV and quickly works out that Jango is behind it, realising that he is still in contention for the hunt.
Zam initially believes that they will deliver Fust and then split the bounty between them but Jango declares that she will deliver Fust. She then realises that Jango is working another job and offers her help but Jango replies that he's letting her tag along as he thinks she might be useful. Jango instructs her to drop him off in the jungle and then convince Sebolto to let her stay and find a way to allow Jango to sneak into Sebolto's Palace. Jango makes his way to the cliffs directly opposite from Sebolto's compound and he covers Zam with a sniper rifle while she sends a transport over to him. The two arrive back at the entrance to the palace but Jango tells Zam to return to the ship while he tries to find Sebolto's death-stick factory. After he kills Sebolto's guards, Sebolto flees into his factory, but falls into the machinery and dies with Jango quipping "It'll be a sour batch". Jango fights his way through the factory and finds the Bando Gora occupying an underground cave. He finds the Bando Gora ship and tries to access its flight log. It doesn't have one but the instrumentation is in Huttese. Montross appears and briefly battles with him (also taunting him about the death of Jaster Mereel at the Battle of Galidraan), but Zam arrives in the Firespray and Montross retreats, enabling them to escape.
The Firespray boosts away from Malastare. Zam wants to know what's going on with Jango, and presses him for details about his "other job," swiftly connecting it to Montross' mention of Vosa. Jango tells Zam about the death-sticks he found in Haugg's plant and says that the Bando Gora ship had Huttese markings on it. He deduces that Vosa uses Hutts to transport the death-sticks; she sends them to Tatooine and then they are sent on to Malastare to hide the trail. Zam works out that if the Hutts deal directly with Vosa, then they will know where she is. They set a course for Tatooine but Montross, having planted a listening device on the ship, follows them.
Rozatta informs the bounty hunters that the two major Hutts, Jabba and Gardulla, are currently feuding for control of Tatooine. From this, Jango works out that the Hutts are not working together and Rozatta tells him that a gift must be presented to the Hutts in order to determine which of them is in league with the Bando Gora. A junk dealer has mentioned a bounty posted by Jabba on the outlaw Longo Two-Guns and his cronies. If Jango catches them, he can be guaranteed an audience with Jabba. Though Gardulla is more of a recluse and will be harder to get to. The bounty hunters decide to split up; Jango sets out to hunt down the gang for Jabba while Zam goes to search for Gardulla's palace (though she is rather miffed that Jango is going to "have all the fun"). Before she chimes out, Rozatta asks the name of Jango's new ship. He answers, "she's called Slave I." Jango tracks down and captures Longo in a podracing hangar in Mos Gamos. When delivering the bounty to Jabba, Jango tells the Hutt that he is after the Bando Gora. Jabba angrily replies "I do not deal with such scum!" and reveals that Gardulla houses the Bando Gora's information. He also asks the bounty hunter to eliminate the rival Hutt; adding that he can gain access to her palace via the Tusken Canyon though it is heavily populated by the Sand People. Jango contacts Zam, who informs him that the palace is crawling with Bando Gora and she is not sure she can get inside. Then Jango hears Zam struggling with someone, and her transmission cuts off.
Fett makes his way to Gardulla's palace through the canyon and infiltrates the compound where he finds Zam in a cell, but won't let her out yet because the empty cell would alert the guards. Zam is furious, thinking he's ditching her so he won't have to split the bounty and calls the guards down on him. Gardulla captures Jango and throws him into an arena pit without his weapons to face off with her pet krayt dragon. However the guards did not take away his cutting laser, with which he is able to escape the arena. He retrieves his weapons and fights through the palace. Jango confronts Gardulla in her throne room, where he steals the key to her vault. Jango tells Gardulla that Jabba sends his regards, then feeds her to the krayt dragon. Jango then kills the dragon before he makes his way to the vault, where he finds an encrypted computer that he sends to Rozatta. Jango returns to Zam's cell and she tries to apologise but he refuses to listen and abandons her. He departs Tatooine in Slave I.
The bounty hunter tries to contact Rozatta again, but is answered by Montross, who has tortured the Toydarian for Vosa's location, which was in the encrypted computer. Jango is positively outraged but Montross calmly replies "it's just business old buddy".
Meanwhile Vosa realises she has underestimated Jango and remarks "it is time the hunters become the hunted" and orders that he be killed.
Slave I boosts back to the Outland Station and docks quickly. Jango runs inside and finds Rozatta lying on the ground, injured. She says Montross has set thermal charges around the station that are ready to blow. However, she still manages to keep the coordinates for Vosa's location. She hands them to Jango and breathes her last words, saying that if Jango succeeds he should find something to live for other than money. Jango leaves moments before Outland Station explodes.
Jango Fett is captured by Komari Vosa.
Jango heads to Kohlma, a small moon of Bogden, and finds Montross waiting for him outside Vosa's castle wearing his own Mandalorian jetpack and helmet. The two battle, and Jango finally defeats Montross who requests that he be given "a better death". But, as revenge for killing Rozatta, Jango leaves Montross to be mauled by the Bando Gora. Jango then heads for Vosa's Castle, but as he tries to infiltrate the castle, he is overwhelmed by the Bando Gora forces and blacks out.
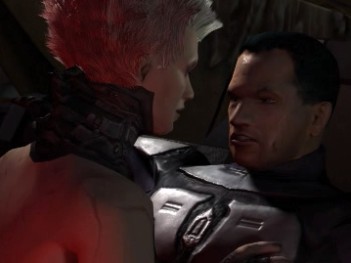
Two Bando Gora torture Jango until Vosa arrives and questions him, demanding to know who hired him. Jango refuses to answer. She pushes her body onto his, whispering to him, that he will be her slave. Vosa is just getting warmed up when she apparently senses Zam, who somehow followed Fett to the lair and is concealed just outside the interrogation room. Zam smiles at Jango and swiftly blasts the two Bando Gora. Zam and Vosa face off, with Zam apparently having a quick mental debate over whether to first free Jango or secure that big bounty, until Vosa attacks. The two women melee briefly until Vosa deflects a blaster bolt into Zam, who falls. As Vosa approaches to finish Zam off, Zam shoots off Jango's restraints. Jango snatches his blasters off the nearby table and attacks the startled Vosa, who flees. He then checks on an incapacitated Zam and eases her to the floor, telling her to save her strength. Jango gears up, and as he leaves, he comments, "Back in a minute."
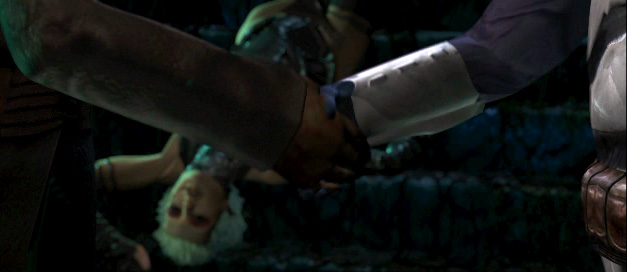
Jango Fett and Darth Tyranus making a deal that would change the galaxy over the dead body of Komari Vosa
Jango manages to catch up to Vosa and defeat her, bringing her at blaster point. Vosa iterates: "Which will it be, bounty hunter? Dead, or alive?" Jango lowers his pistol, but after he does so, Vosa is strangled by an unseen force and dies. Jango turns around to see a bearded man standing next to him and recognizes him as Tyranus, the man who hired him. Tyranus remarks that Vosa was his padawan but she went rogue and thus had to be eliminated. Jango realises that Tyranus knew where Vosa was all along and could have easily killed her himself so is curious as to why he put a price on her head. He replies that it was to find Jango, though the bounty hunter is only interested the reward. Tyranus confirms this but adds it could be considerably more than 5,000,000 and offers Jango a secondary deal to come to Kamino to be cloned. Fett accepts the offer on the condition that he gets the first clone (unaltered) for himself - thus honoring Rozatta's final wish. Tyranus agrees.
After the deal, Jango carries Zam out of the castle. As they head towards Slave I, she asks if he would still split the reward 50/50, but Jango tells her to not push her luck.

Game cover art
The game is played in third person and includes eighteen "levels" across six worlds. The worlds featured in the game are Outland Transit Station, Coruscant, Oovo IV, Malastare, Tatooine and Kohlma, a moon of the planet of Bogden. In addition to the main story, the game features secondary objectives which are optional to the player. These secondary objectives are known as bounties, which can be marked by targeting enemies or NPCs with Jango's ID scanner, changing the camera into first person.
There are several unlockable features in the game, which are unlocked by collecting Mandalorian feathers, completing levels and collecting bounties. Each Mandalorian feather collected unlocks a new card from the Wizards of the Coast Star Wars Trading Card Game with focus on the characters in the game. After completing each level, three pages are unlocked from Jango Fett: Open Seasons 1 by Dark Horse Comics. One page of concept art is unlocked for every 3,000 credits earned by catching secondary bounties. A series of outtakes by the voice actors with accompanying animation are unlocked after each game chapter is completed.
Bounties are an optional secondary objective in Star Wars: Bounty Hunter. They can be found in each chapter except the last one.
In order for the player to claim a bounty, Jango must use his ID scanner and focus the targeting reticle on any creature or droid. If they are bounties, a picture as well as a bit of information about the target will appear. Bounties can be taken either dead or alive. Information on which method is worth more will be presented to Jango after using his scanner. Once a bounty has been identified, Jango can mark the bounty, and the target will be tracked. Jango can claim the bounty either by killing the target or by using the whipcord launcher to fire a fibercord whip to tie up the bounty and capture the target alive. Once a bounty has been dealt with, walking over to the target will present an option to claim the bounty. The reward will immediately follow, and the target will disappear. If a target is killed before being marked, then the bounty is worthless and cannot be claimed.
The following is a list of most of the bounties that can be claimed in Star Wars: Bounty Hunter along with their rewards.
Production began in November of 2000 when LucasArts were asked to make a game based on Star Wars: Episode II Attack of the Clones featuring Jango Fett. They presented the game design proposal in March of 2001, and development started soon after. Jon Knoles revealed in an interview that they wanted to develop Jango into the ideal action-based video-game character and that he was to be exciting to watch and fun to play. Secondly they wanted to develop a story that fleshed out Fett's character more fully than in Attack of the Clones, while at the same time remaining true to the spirit of his character as seen in the film. It was imperative to not dull the game with a slow story and leaden script; as such, their goal was to work a fine balance between back story, narrative, and action-packed gameplay. Knoles said Jango Fett was developed to be an extension of the player's will, the ideal vessel through which the player could live out the fantasy of being the galaxy's most dangerous bounty hunter. His movement and animation blending system was designed to automatically react to other world objects and to never be unable to use his weapons or devices in any situation. The jet-pack was originally designed to be used in areas specifically designed for its use. When the team got it working, they changed their minds and implemented a rechargeable timer on it so the player could use it anywhere for a limited time. At the most, the crew was over fifty people that were working on the game, excluding Industrial Light & Magic (ILM).
Their concept artists looked to the team's favorite graphic novels for inspiration and the concept artwork by Ralph McQuarrie, Doug Chiang, Joe Johnston, and others who worked on the Star Wars films. They were given access to the Episode II script and concept art early on before the film came out. LucasArts created storyboarded scripts of their cutscenes and gave them to ILM, who developed them into cinematic cutscenes. Knoles envisioned the level layouts and then consulted with lead level designer and his level designers. They created a bubble map of the levels which they worked from to determine details in what the player would face and be able to do. The team made a new engine for the game to be able to do what they wanted. The graphic designers worked concurrently with the level designers to create the environments, which the level designers then used to better visualize what they were trying to do. Knoles had previously been involved in the development of the Super Star Wars trilogy for the Super Nintendo and often referred to those games when describing certain aspects of Star Wars: Bounty Hunter to the team.
The PlayStation 2 and Nintendo GameCube versions of the game have different custom in-house graphics engines, each designed specifically to take advantage of the two platforms' unique strengths and work around their unique limitations, but the core game engine is identical. In the PS2 version they took advantage of both vector unit (VU) chips to drive the graphics to maximum performance. The DMA bandwidth was taken advantage of to use a high number of textures. There is full-screen antialiasing and texture mip mapping support. They used the second VU1 chip to handle all the character skinning and VU0 to handle all the skeletal animation transforms. Which enabled dozens of characters to be on-screen without bogging down the frame rate. They had 10 individually optimized rendering loops on VU1 to speed up the rendering process. Their PS2 graphics engine could move 10,000,000 triangles per second, and adding the gameplay, collision, logic, textures, sound would go down accordingly to around 30,000 to 50,000 triangles per frame, all at an average frame rate of 30 frames per second.
In the Nintendo GameCube version, they took advantage of the system's fast CPU to achieve a higher frame rate, and added more polygons to characters, especially Jango, who has roughly twice the polygon count on GameCube. The GameCube's texture compression allowed them to use high-resolution textures. Texture compression also allowed for improved color variance on textures. Mip mapping support across the board on all textures helped provide a rich and consistent environment. They exploited additional memory to improve load times. They implemented projected shadows on all the characters and an increased draw distance to allow for vista views.
Industrial Light & Magic and Skywalker Sound assisted in the creation of the game, which was the first collaboration between LucasArts and ILM in the field of in-game cinematics. Knoles said LucasArts and ILM learned a great deal from their cooperation, which allowed ILM to try new methods for creating scenes, as well as new tools and techniques. LucasArts provided ILM with models, textures, and a storyboarded script, and then applied their cinematic expertise in adapting the script into dynamic and visually stunning films. The sound designers of LucasArts and the sound designers at Skywalker Sound worked together to create the game soundtrack. Skywalker Sound made sounds directly for game animations and events, and created Foley sounds.
Jango Fett: Open Seasons was produced as a tie-in comic, composed of four issues released between May and September 2002, and compiled in a trade paperback edition in January 2003. The comic shows the origins of Jango and how he became a Mandalorian warrior. A portion of the comic was available as unlockable bonus material in the game. Prima Games also released Star Wars: Bounty Hunter: Prima's Official Strategy Guide.
- "State of the Arts" — Star Wars Gamer 10
- "Gamescape" — Star Wars Insider 63
- "Red Five, I'm Going In" — Star Wars Insider 65
- Star Wars Year By Year: A Visual History, New Edition
- "Turn It Up!" — Star Wars Insider 221