During the Galactic Civil War, the Rebel Alliance Fleet engaged in a skirmish with an Imperial Strike-class medium cruiser at Haven, the Rebellion's secret deep-space rendezvous point, in the aftermath of the Battle of Hoth. Driven from their Hoth fortress in the face of overwhelming Imperial might, the surviving Rebel forces regrouped with the tattered remnants of the Alliance Fleet at a point far beyond the Galactic Rim, where they believed the Empire would not track them. The battered Rebel Alliance desperately sought sanctuary and time to recoup its staggering losses, as did Jedi Luke Skywalker, recovering with the fleet from his recent lightsaber duel with the Dark Lord Darth Vader on Bespin's Cloud City.
Although Haven was remote, the Imperial Strike cruiser had discovered the Alliance Fleet by chance. The Rebels responded quickly by jamming the Strike cruiser's transmissions and sending Wedge Antilles and the elite pilots of Rogue Squadron to destroy the enemy vessel, lest it escape to reveal their position. Flying in their X-wing starfighters, the Rogues had little trouble dispatching the Strike cruiser's TIE fighter complement before eliminating the cruiser itself with a flurry of proton torpedoes. Nevertheless, with its secrecy compromised, the fleet soon broke formation and headed back toward the galactic plane in search of a new haven.
The Battle of Hoth in 3 ABY proved to be the Rebel Alliance's worst battlefield defeat of the Galactic Civil War. The Galactic Empire's overwhelming strength drove the Rebellion from its headquarters on the ice planet as the Dark Lord of the Sith Darth Vader personally sought to capture his Rebel son, the burgeoning Jedi Luke Skywalker. Although the Hoth defeat cost the Rebellion greatly, the Alliance leadership escaped to regroup with the Alliance Fleet at a secret deep-space rendezvous point far beyond the Galactic Rim, codenamed Haven.
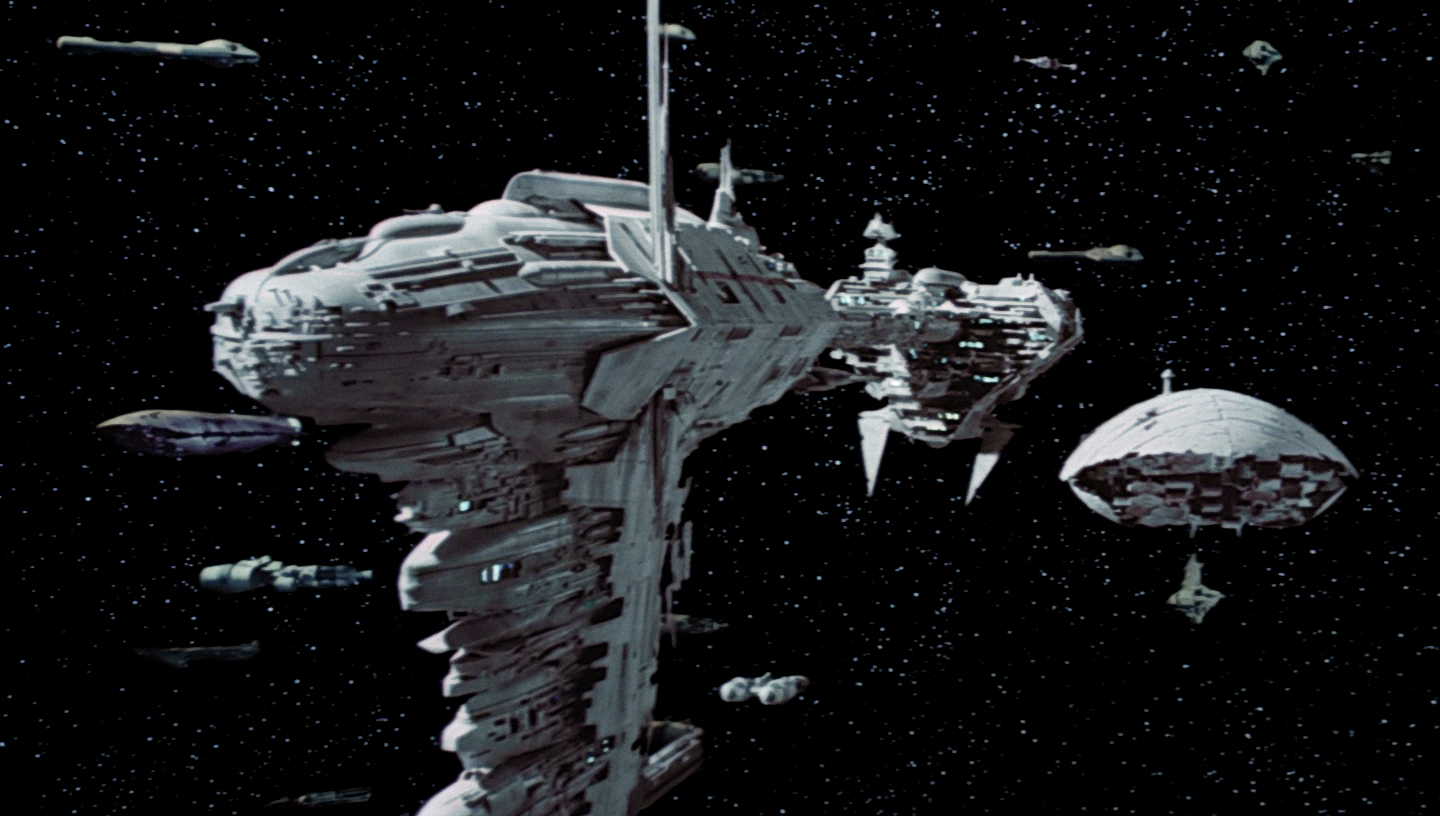
The Alliance Fleet regroups at Haven, the Rebellion's secret rendezvous point.
Meanwhile, Vader engineered the Imperial takeover of Bespin's Cloud City as well as the capture of Rebels Han Solo and Princess Leia Organa. But the Dark Lord's trap failed to net his true prize, Skywalker, who escaped Bespin with Organa and newfound ally Lando Calrissian after fighting a fierce lightsaber duel with Vader in which the young Jedi lost his right hand. The defeated Rebel heroes eventually reached the Alliance Fleet at the rendezvous point, and Calrissian soon departed aboard the starship Millennium Falcon in search of Solo, whom Vader had given to the bounty hunter Boba Fett for delivery to crime lord Jabba the Hutt. Skywalker, Organa, and Calrissian ultimately planned to rendezvous on the planet Tatooine, where they knew Fett would eventually arrive to link up with Jabba.
Haven lay at a position above the galactic plane, far from any stars and from where the Rebels believed the Empire would track them. To reach the rendezvous point was a perilous journey, one that required the Alliance Fleet to ascend out of the galaxy's gravity well. Many ships could not survive such a trip, and additional losses were certain. For the Rebellion to take such a risk was a sure sign of desperation but also spoke of its dedication to regroup and continue fighting. Yet victory over the Empire seemed hopeless for the fleet's tattered remnants, and the fortunes of war offered the battered Rebels little time to regain lost strength.
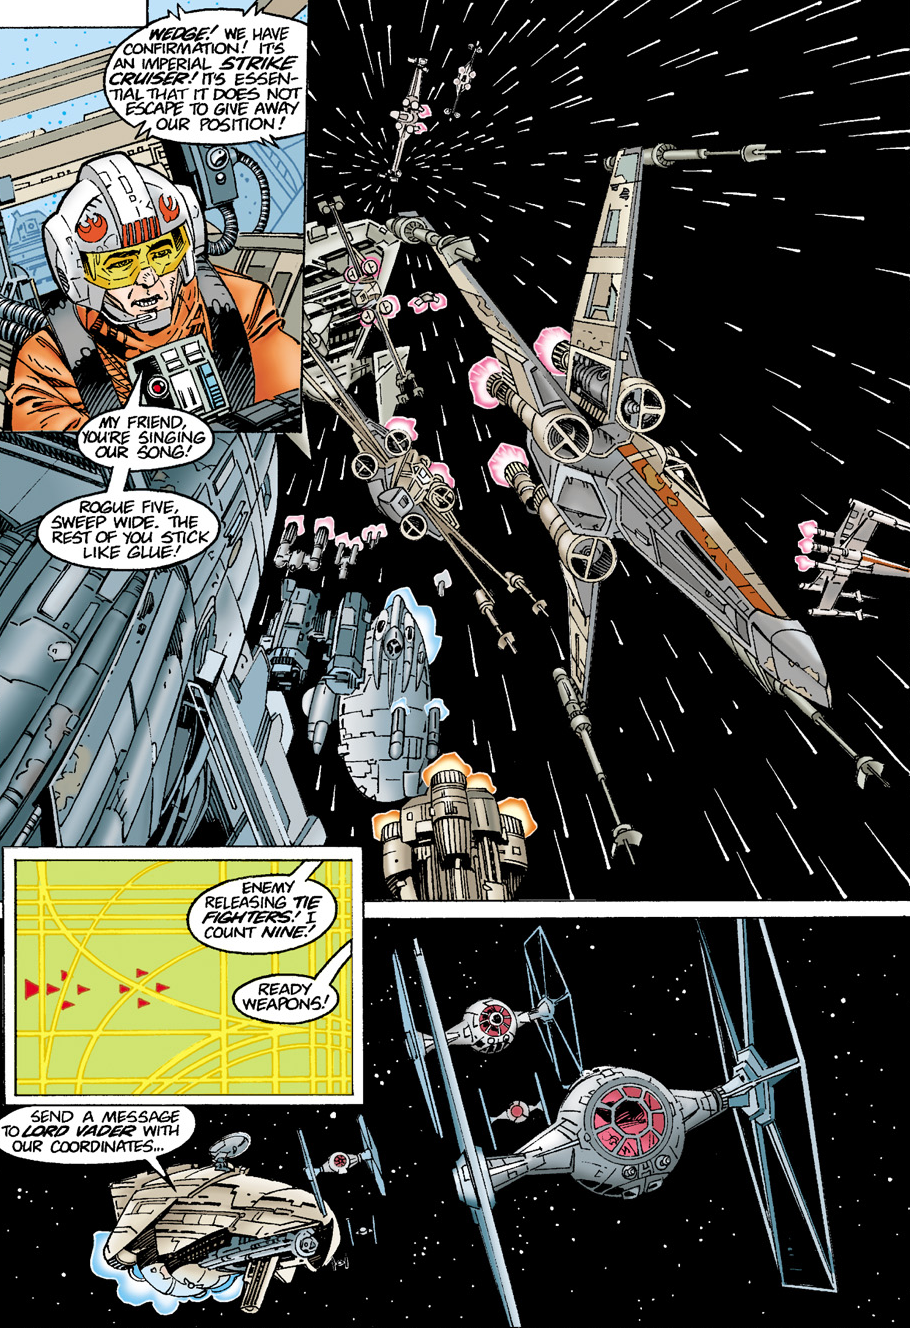
The X-wings of Rogue Squadron prepare to engage the incoming Imperial TIE fighters.
Mere hours had passed since Lando Calrissian's departure from Haven when crisis met the Rebels once more. The surprise appearance of an Imperial Strike-class medium cruiser sent the Alliance Fleet scrambling to intercept its hostile intruder. The rendezvous point was indeed remote, but the Rebel armada registered a sizable anomaly on scanners, and the Imperial vessel had happened upon its position by chance. Still recovering from emergency prosthetic limb replacement surgery aboard the medical frigate Redemption, Luke Skywalker was all too eager to jump into his T-65 X-wing starfighter and do his duty to help the fleet, but Leia Organa and the droids C-3PO and R2-D2 talked him out of it—not only did he need to rest, but his X-wing was undergoing maintenance anyway, rendering the point moot.
Nevertheless, the fleet still boasted the services of the elite pilots of Rogue Squadron, recently arrived at Haven following action at Hoth. Indeed, the fleet held numerical superiority over the Strike cruiser—the frigate Redemption, two CR90 corvettes, three GR-75 medium transports, BTL Y-wing starfighters, and various other vessels, in addition to the Rogues' six X-wings—but the Rebels' momentary advantage meant nothing if the Imperials were to report their position. Directing the skirmish from aboard one of the fleet's medium transports, a Rebel commander impressed upon Rogue Squadron Commander Wedge Antilles via comm of the need to eliminate the Strike cruiser before it could escape.
As Rogue Squadron zeroed in on the Imperial warship, Antilles ordered Rogue Five to sweep wide and for the rest of his pilots to stay close to him. The Strike cruiser quickly deployed nine TIE/LN starfighters of its own while its commander ordered his pilot to send their coordinates to Darth Vader with a message indicating that they had found the Rebel fleet. However, the Rebels had already employed jamming measures, effectively preventing the Imperials from sending out any transmissions. The Rebel commander's medium transport opened the skirmish by destroying one of the oncoming TIE fighters with its laser cannon, and the dogfight was soon joined between Rogue Squadron and the eight remaining Imperial fighters.
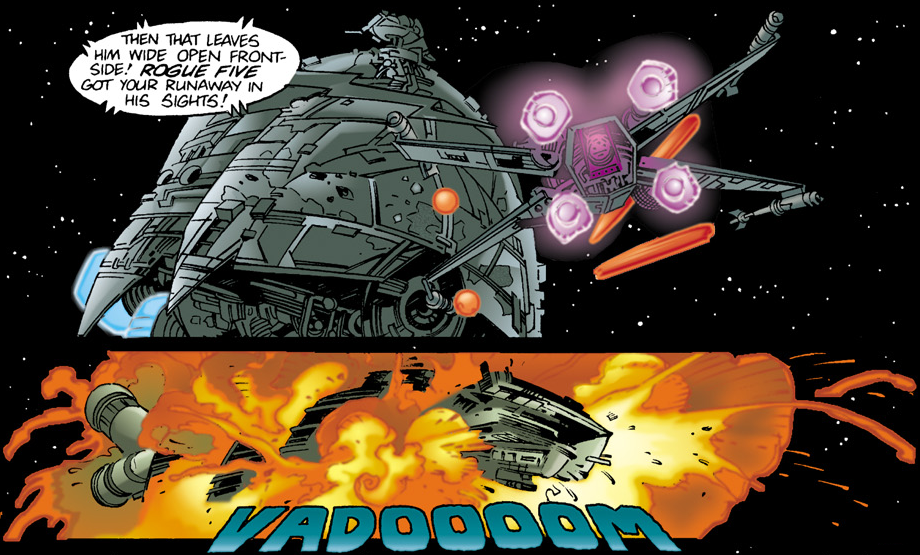
Rogue Squadron eliminated the Strike cruiser before it could escape to give away the Alliance Fleet's position.
To the Rogues' advantage, the TIEs broke formation after making their first pass, allowing the Rebel fighters to take control of the engagement. Antilles' pilots had little trouble sweeping through their Imperial foes, with the exception of Rogue Three, who allowed two TIEs to close in on his tail. One of the pursuing TIEs landed a hit on Rogue Three's engines, but Rogue Two came to the rescue by piercing one of the TIE's solar panels with laser fire, which sent the Imperial fighter crashing into its wingman, destroying both in a fiery blaze.
With all the TIEs dispatched, the Strike cruiser turned to run, setting off a chase between the Rebels and the fleeing Imperial vessel with its jeopardizing knowledge of the Alliance Fleet's location. The Strike cruiser diverted full power to its rear shields as it fled, which deflected fire from the Rebel commander's pursuing medium transport. However, such a shielding configuration merely left the Strike cruiser's bow exposed, an easy target for the pilots of Rogue Squadron. Rogue Five, whom Antilles had ordered to sweep around the combat zone at the engagement's onset, moved in for a frontal assault, and the Rogues destroyed the Strike cruiser with a barrage of proton torpedoes.
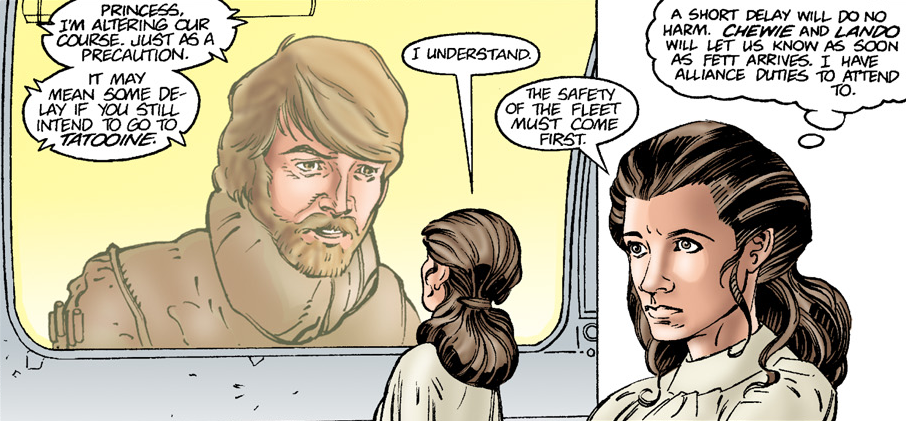
Princess Leia consented to the Alliance Fleet's course change, even though it would delay her plans to rescue Han Solo.
Rogue Squadron eliminated the Strike cruiser and its TIE fighter complement while suffering no major casualties, but the Alliance Fleet's secrecy had been compromised nonetheless. As a precaution, the Rebel commander altered the fleet's course, and the armada broke formation and began heading back toward the galactic plane. The commander informed Leia Organa via viewscreen aboard the Redemption that his decision could mean a delay in her plans to rendezvous with Lando Calrissian on Tatooine, but the princess understood that the safety of the fleet took priority over her personal desires, and she reasoned that Luke Skywalker badly needed the extra time in recovering from his encounter with Darth Vader.
A report of the Alliance Fleet's possible location did reach Vader, who intended to follow up on the lead in his continuing search for Skywalker, but Emperor Palpatine had other plans for his minion. The Emperor ordered Vader back to the Imperial throneworld of Coruscant to negotiate shipping arrangements with Prince Xizor of the Black Sun crime syndicate as part of the Empire's secret construction of the second Death Star battlestation.
The skirmish at Haven appeared as the opening sequence in the first issue of the Dark Horse comic book series Star Wars: Shadows of the Empire, written by John Wagner and illustrated by Kilian Plunkett. The first issue was published on May 7, 1996.
During the comic's development stage, in response to issue 1's first draft, Lucasfilm Licensing editor Allan Kausch instructed Wagner to insert into and then eliminate from the battle a Strike cruiser as part of the Imperial forces. Kausch noted that since TIE fighters are not equipped with hyperdrives, they could not have reached the Alliance Fleet's location without a capital ship carrier. In addition, Kausch required that the first draft change the line "Ready photon torpedoes!" to "Ready weapons!"
- The Secrets of Star Wars: Shadows of the Empire
- C-3PO: Tales of the Golden Droid