Moog Mot VI was an Outer Rim Territories banking world located in the Tharin sector. It hosted a Galactic Empire garrison, where Imperial technicians at one point mined the data core of the chief accounting droid of Sollima—a crime lord from whom the Empire wanted to wrest control over the gambling space station known as the Hollow Moon.
Around 1 BBY, Sollima forced the smuggler Han Solo to team up with his former thieving partner Billal Batross in order to retrieve the accounting droid from the Empire. The pair traveled to Moog Mot IV, where they infiltrated the garrison by posing as Imperial officers and succeeded in locating the droid. However, Batross, on whom the droid held incriminating information, destroyed it, and he and Solo were subsequently captured and interrogated by the Empire. In turn, the garrison's Captain Taavin then forced the pair to betray Sollima and help the Empire take over the Hollow Moon, and Solo and Batross subsequently departed from Moog Mot VI on their new assignment to the space station.
Moog Mot VI was a world that occupied the sixth orbital position in the Moog Mot system, a part of the Tharin sector in the Slice portion of the Outer Rim Territories. It was situated on the Triellus Trade Route hyperlane, which linked it to the Dennogra and Taskeed systems. Moog Mot VI had reddish skies and a red-colored rocky surface.
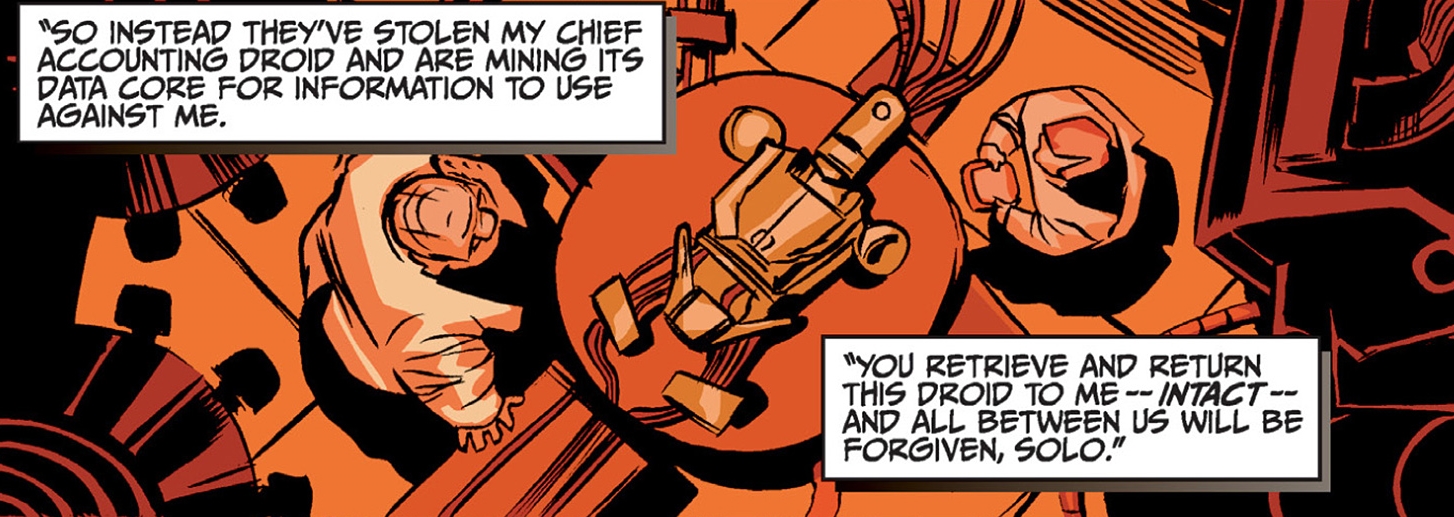
On Moog Mot VI, the Galactic Empire mined the data core of Sollima's chief accounting droid.
Years before 1 BBY, the Galactic Empire put into motion plans to gain control over the Hollow Moon, a Hutt Space gambling space station run by the crime lord Sollima. To that end, the Empire purchased Sollima's principal accounting droid from Billal Batross, a thief who was in debt to the gangster and wanted to dispose of the droid since it was aware of him stealing money from Sollima. The Empire stored the partially disassembled accounting droid—which Sollima believed the Empire had stolen—at the Imperial garrison on Moog Mot VI, where technicians mined its data core in order to obtain information that would prove useful against Sollima.
Around 1 BBY, Sollima captured on the Cadma sector planet Simbarc Han Solo and Chewbacca, a pair of smugglers who were also indebted to the crime lord. Upon the suggestion of Batross, who was a former thieving partner of Solo's, Sollima tasked the latter with traveling to Moog Mot VI and retrieving his droid from the Empire. In addition, since Sollima decided to keep Chewbacca hostage in order to ensure that he and his partner would not simply flee after being released, and since Solo still needed a copilot for the mission, he was paired up with Batross. Solo and Batross then left Simbarc for Moog Mot VI aboard the former's light freighter, the Millennium Falcon.

Han Solo and Billal Batross infiltrated the Imperial garrison on Moog Mot VI in order to retrieve Sollima's droid.
After the freighter emerged into realspace at the Imperial banking world, it transmitted to the Imperial forces a falsified landing code provided by Sollima. Donning fake Imperial uniforms as disguises, Solo and Batross subsequently entered the garrison. There, the former used holographic schematics of the facility to locate the room where Sollima's droid was being kept while Batross was deliberating on robbing the Empire's acquisitions and processing center and making off with a large number of credits. Entering the room without the necessary clearance code, Solo knocked out the technician working on the droid and then tasked Batross with disconnecting the automaton from the wiring that had been plugged into it while he dragged the unconscious technician away.
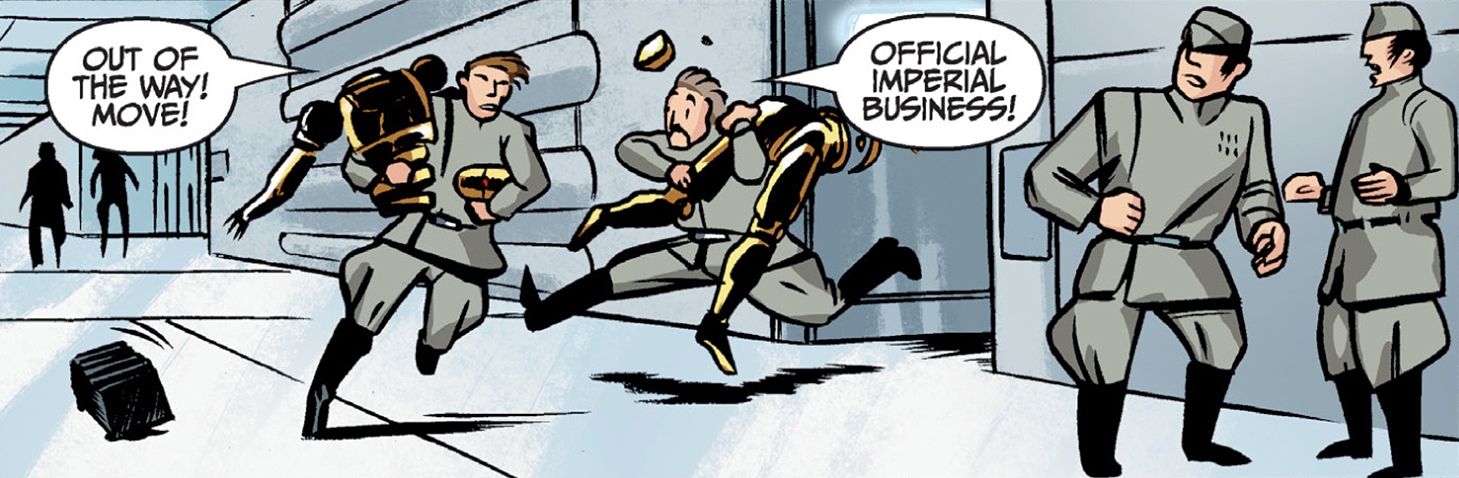
Solo and Batross attempt to steal Sollima's droid from the Moog Mot VI garrison.
However, Batross, who was intent on hiding the tracks of his theft from Sollima, then shot the droid's head, angering Solo because Sollima had wanted the droid intact, and Batross's actions thus put the captive Chewbacca's life in danger. When Batross subsequently did disconnect the wires from the droid, an alarm was triggered, forcing the pair to grab the droid's disassembled parts and flee the room. The would-be thieves quickly ran into a stormtrooper patrol, to whom Batross immediately surrendered. The pair was then arrested and taken away for interrogation under torture.
When Batross divulged to Imperial Captain Taavin the details of his and Solo's mission, the captain liberated the pair and offered them a choice between standing trial for sabotage and treason or returning the droid's remains to Sollima at the Hollow Moon and then overriding the station's security codes, thereby allowing the Empire to take over the gambling establishment. Solo and Batross accepted Taavin's latter offer and boarded the Millennium Falcon, departing from Moog Mot VI for the Hollow Moon.
Moog Mot VI was a banking world controlled by the Galactic Empire, with three Imperial Star Destroyers patrolling in its orbit. The Imperial garrison on Moog Mot VI was staffed by several Galactic Basic Standard–speaking Human officers and technicians as well as stormtroopers. The facility's crew also included a protocol droid and several mouse droids.
Moog Mot VI had on its surface a Galactic Empire garrison, which included two towering dark metallic structures. The Imperial installations on the world also featured an acquisitions and processing center as well as a room outfitted with torture equipment.
Moog Mot VI first appeared in Han Solo and the Hollow Moon of Khorya, the first entry in Dark Horse Comics' Star Wars Adventures series of graphic novellas. Han Solo and the Hollow Moon of Khorya was written by Jeremy Barlow, pencilled by Rick Lacy, and published on April 29, 2009. The August 18, 2009 reference book The Essential Atlas placed the Moog Mot system, and therefore Moog Mot VI, in grid square S-8.